So far in this series about the IBM Data Studio Developer
integrated development environment (IDE) that’s available with DB2 Version 9.5
(DB2 9.5), I’ve shown you how to set up database
connection objects and the actions that you can perform on them. In
addition, I introduced you (in Part 2)
to some of the features available in the Database Explorer view, and Part 3
and Part
4 gave you a full tour of overview diagrams. In Part 5,
you learned how to point-and-click your way to OLE DB functions that can
integrate data from external data sources that have an OLE DB provider. In Part 6,
I showed you how easy it is to create an SQL statement using the IBM Data
Studio SQL Builder. In this installment, I’m going to show you my four favorite
features in the SQL Builder that make this tool even more helpful than just point
and clicking your way to an SQL statement like I showed you in the last
article.
I recommend that you start with Part
1 because I tend to build on the concepts and objects created in these
series sequentially. For this article, I assume that you’ve at least created
the SAMPLE database (use the db2sampl –xml –sql command) and that the FEMALEPERSONNEL
SQL statement built in Part 6
resides in the SQL Scripts folder in a database development project.
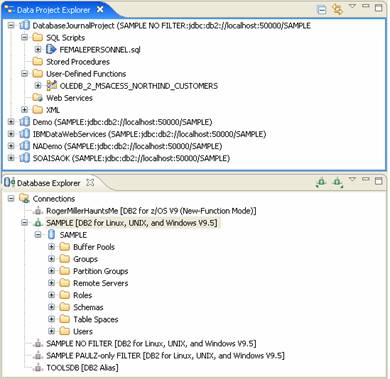
Your Data Project Explorer and Database Explorer views should look similar to
these:
In this section, I’ll talk about my favorite features that
really help boost productivity when you’re designing SQL statements using the
Query Builder. I may have mentioned some of the features in past articles in
this series, but this section will serve as a place where they can all come
together.
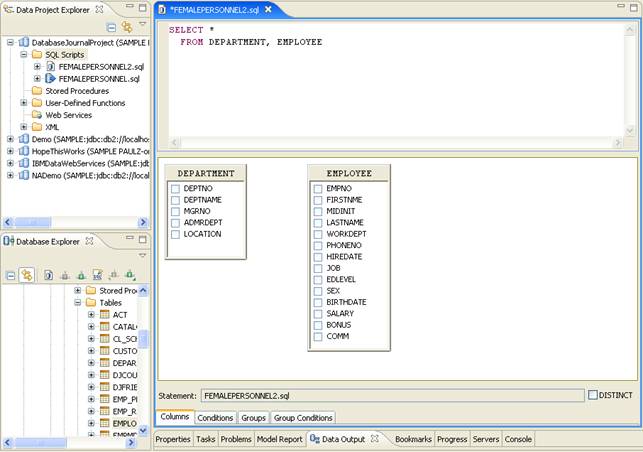
In the last article, you added columns to the query by
simply selecting them from the middle pane of the SQL Builder. While you can
use the graphical controls at the bottom of the SQL Builder to add clauses to
your SQL statement, most developers are likely to use a combination of manual
entry and assisted entry (like the Add Join and projection options I
covered in Part 6). While the check box column definition method is more useful
for those not as adept in writing SQL, even SQL maestros will want to use
contextual assistance while they are writing the SQL statement; the SQL Builder
offers this with SQL Assist.
In the area of the SQL Builder that displays the actual text
of your SQL statement, try to manually append the following condition (shown in
bold text below) to the SQL statement that was automatically generated
for you:
SELECT * FROM DEPARTMENT, EMPLOYEE WHERE PAULZ.EMPLOYEE.WORKDEPT=’A00’ AND SEX=’F’ ORDERBY PAULZ.EMLOYEE.LASTNAME
Note:
Don’t forget to substitute the schema qualifier PAULZ used in this article for
the schema you used to create the SAMPLE database. (On a Windows platform, it’s whatever user account you were logged in with when you ran the DB2
CREATE DATABASE command or db2sampl.)
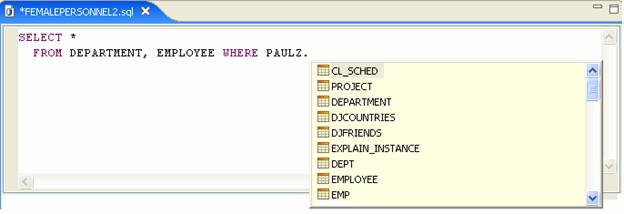
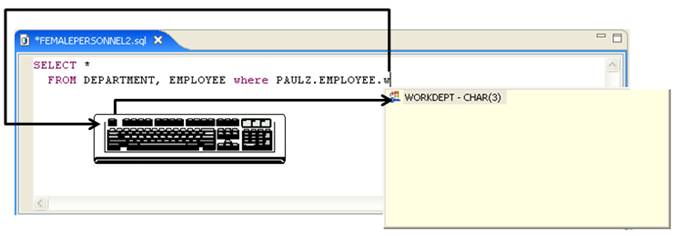
Now I want you to erase the
newly typed text and retype it pausing ever so slightly after you specify PAULZ – of course, replace PAULZ with your schema name. (Stop at the period.) In IBM
Data Studio, when a period (.)
follows a schema name that DB2 recognizes, the SQL Assist feature is
automatically engaged and all the applicable objects in context (in this case,
the schema objects) are automatically presented in a pop-up list for you, as
shown below:
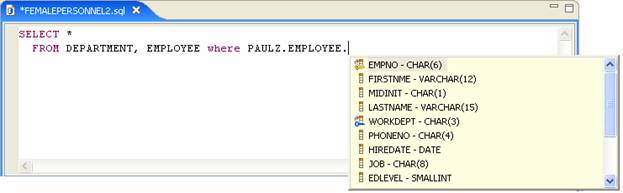
Simply select the object you are looking for from the pop-up
list and press Enter. In this example, select the EMPLOYEE table and
briefly pause after typing the qualifying period after the EMPLOYEE
table name. You can see that SQL Assist is smart enough to recognize the
context of the SQL statement: notice below that the pop-up list only shows the
columns that are part of the EMPLOYEE table:
If you’re following along in this example, you’ll want to
select the WORKDEPT column. Sometimes you may notice that the column you want
isn’t on the pop up list. Obviously, you can use the scroll bar or your cursor
movement keys to scroll down the list of returned columns – but there’s a
better way! SQL Assist has filter and stemming options that quickly move focus
in the pop-up list to the location based on the first key you press. In this
example, if you pressed W,
then the SQL Assist pop-up list would only display those columns that begin
with this letter:
Note:
You can also invoke SQL Assist by right-clicking in your SQL statement window
and selecting SQL Assist from the pop-up menu, or by pressing Ctrl+Space
after specifying an object name in your SQL statement.
Continue building this SQL
statement, but now I want you to manually enter the AND SEX=‘F’ restriction. (Notice that it changed color –
we’ll talk about that in a bit.) You can see that sometimes it’s better just to
type something quickly than to leverage SQL Assist. As you get more accustomed
to this great feature, you’ll decide for yourself when to use it and when to
use your old fashioned fast-typing fingers. In this case, I know I don’t
actually have to specify the schema here, and I know there is a column called SEX, and I know the value and its
corresponding data type, so it was just faster to enter it myself.
Enter a space after SEX=‘F’. SQL Assist can help further,
but it’s only going to show up if you ask for it using one of the methods
detailed in the previous note (because there is no period triggering the
action). For example, to add the ORDER
BY clause, invoke SQL Assist and manually scroll the entire list of
options to find this operator. (Of course, pressing a letter key will
automatically move focus in the list to the first occurrence for that group):
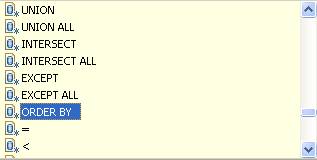
You can see this list is very
long. The point is that there is always some help available for you, and
depending on the context of the SQL statement, it changes dynamically. Finish
building this SQL statement and save your work.
Of course, since views and
nicknames are presented like tables to applications, IBM Data Studio will link
the SQL Assist features to enumerate all the qualifying views and nicknames,
along with tables, in the list returned to the developer.
Another reason why this feature
is so important is that if you were to create an SQL statement using the SQL
Editor, you wouldn’t have the option to drag (or add) tables to the middle pane
of the editor. You would just have the SQL text.
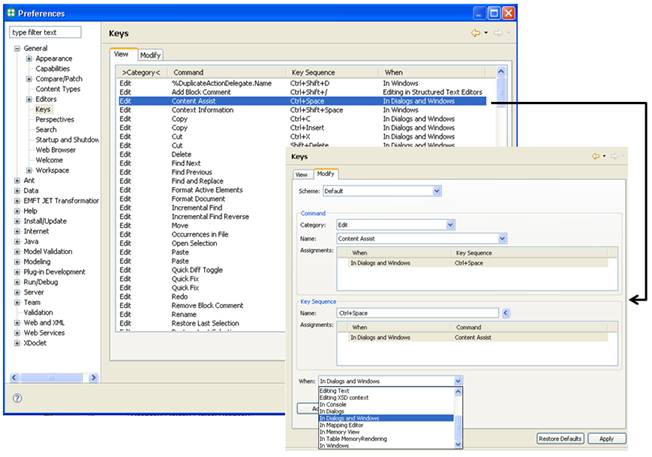
You can also customize the way
SQL Assist behaves in IBM Data Studio. For example, you could choose whether to
display SQL proposals (keywords, templates, and names of database objects) when
you use content assistance while writing or editing an SQL statement. As
previously mentioned, Ctrl+Space is the default key combination for this
content assistance. If you want to change this combination, select Window>Preferences>General>Keys
and change the configuration for Content Assist.
SQL Assist really enhances
productivity because it moves the requirement away from knowledge of the
database schema for productivity and places automated discovery of the schema in the
hands of the application developers for a rapid application development
experience: this is true extreme application development.